The exact extent of this usage may have varied between these companies, but everyone in those businesses that was on a computer had at least some experience with trying to print a spreadsheet. Excel has changed a lot over the years, but one problem that still remains is that most spreadsheets are not formatted well for printing by default. While there is no magic secret that will automatically help you to print all of your spreadsheets perfectly, you can become familiar with all of the possible printing changes that you can apply to your spreadsheets so that they print better, and are easier for your audience to read. Fortunately, there are a lot of options that can help you with printing in Excel 2013, and hopefully help you create the sheet of printed data that you need. Below are some links that you can click to jump to a specific point in this article if you have arrived on this page because you are trying to see how to perform one specific action.
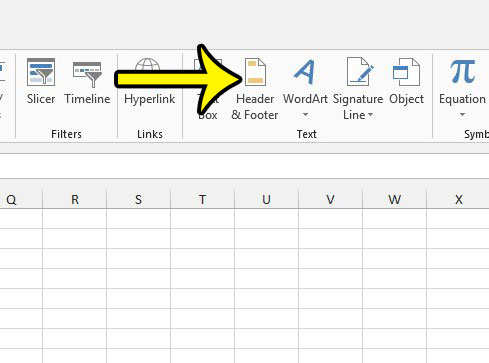
How to Add a Header in Excel 2013
The header section of a spreadsheet in Excel 2013 is at the very top of the page. Content that you place in the header will print at the top of every page. This is the spot where you might want to put the title of your spreadsheet. You could also choose to put a page number in this location. If you would like to highlight some of your rows or columns in a different color, then read more with our apply fill color in Excel guide.
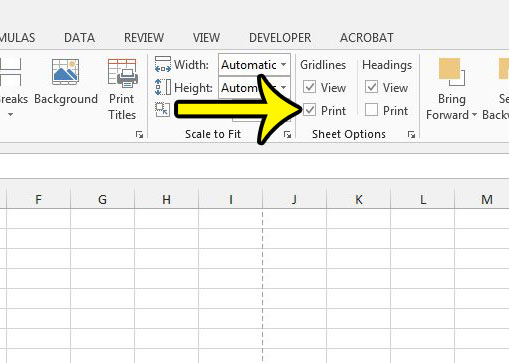
How to Print Gridlines in Excel 2013
Gridlines (not to be confused with cell borders, which are very similar) are the lines that you see in Excel on your computer screen which physically separate the cells in your spreadsheet. But these gridlines don’t print by default, which can make it difficult to visually separate data on the page. Fortunately, you can have Excel print these gridlines and make your sheet a little easier to read.
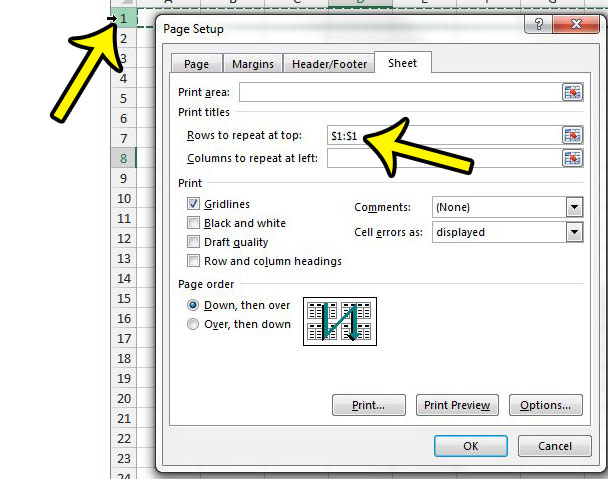
How to Repeat the Top Row on Every Page in Excel 2013
Many spreadsheets will contain a row at the top of the sheet that identifies the information in each column. People reading that spreadsheet will then be able to tell the meaning of the data in each of the cells in that column. But if your printed sheet is more than one page, and that row isn’t repeating at the top of each additional page, then your readers might be trying to match up data to columns, which can create confusion. You may have tried to manually repeat this row in the past, but that can be very frustrating. Fortunately, there is an option in Excel that will repeat this title row for you automatically.
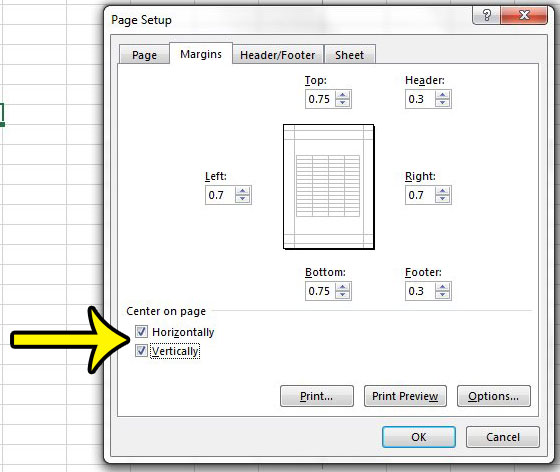
How to Center a Page Horizontally and Vertically in Excel 2013
A spreadsheet that you print in Excel will automatically justify itself at the left side of the page, at the top. This is fine, and almost not even noticeable when the spreadsheet is naturally filling the majority of the page. But a spreadsheet that only has a few columns might look odd when it is left-justified, or you might be using Excel to print something that you would like to locate at the center of the page. Fortunately, you can elect to center the page either horizontally, vertically, or both in Excel 2013.
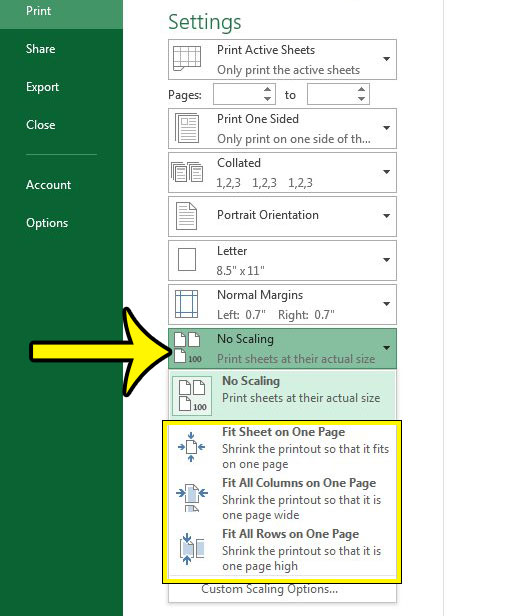
How to Fit All Columns, All Rows, or the Entire Sheet on One Page in Excel 2013
Manually adjusting the row heights or column widths of the cells in your spreadsheet in order to fit your data on one page can be a nightmare. You typically do this when Excel is doubling the number of pages that it prints because of one or two columns that are printing on their own page. There is actually a place on the Print menu, however, where you can tell Excel to automatically fit either all of your rows, all of your columns, or even the entire spreadsheet onto one page.
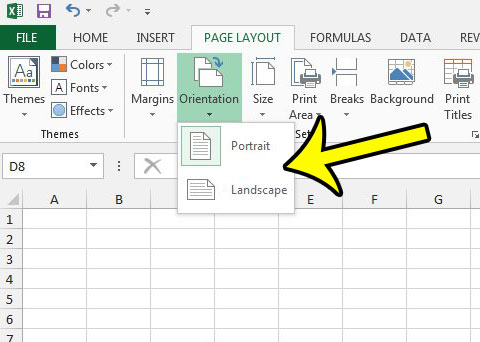
How to Change the Page Orientation in Excel 2013
Your spreadsheets probably print in portrait orientation by default, but this is impractical for spreadsheets that have a lot of columns. Changing the orientation to landscape will reduce the number of rows that fit on a page, but increase the number of columns. The correct orientation is a judgment call based on the “shape” of your spreadsheet, but you can often improve a printed Excel file by switching orientations.
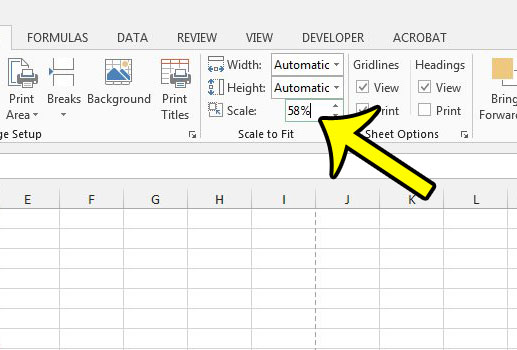
How to Manually Scale a Page in Excel 2013
Previously we discussed using an option on the Print menu to force columns or rows to all print on one page, but you can still choose to manually scale your spreadsheet if you prefer.
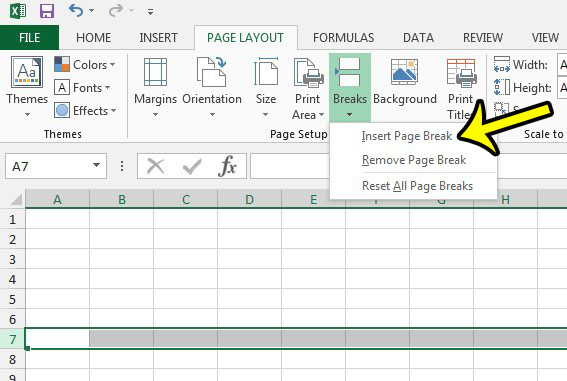
How to Insert a Page Break in Excel 2013
Even if you have configured Excel to print your rows and columns the way that you want, you may still need to include a page break to split up certain segments of data. You can accomplish this will the help of the Page Break tool. Note that manual page breaks will not adjust automatically if you add or remove rows above them, so you may need to go back and fix your page breaks if you find that they aren’t splitting your data properly after some edits to your spreadsheet. Note that if you select a row number, Excel will insert the page break above that row. If you select a column letter, Excel will insert the page break to the left of that column.
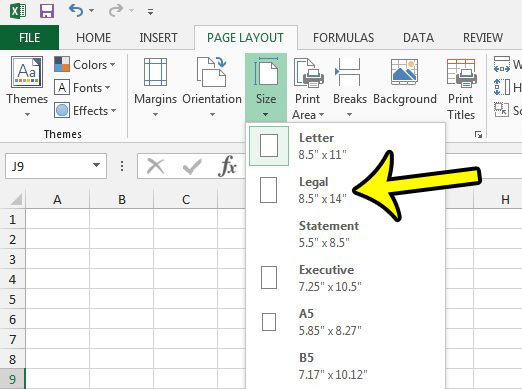
How to Change the Paper Size in Excel 2013
Your geographic location is used by Excel to determine which size paper it should print on by default. In some parts of the world, this is the Letter size, while in others it might be A4. But there are many other paper sizes, and you might have a very large spreadsheet that you would prefer to print on Legal paper.
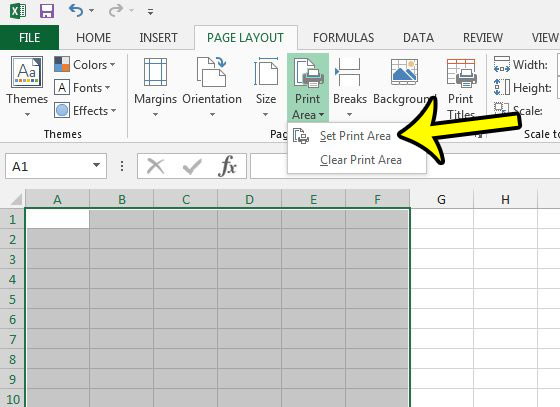
How to Set a Print Area in Excel 2013
Occasionally you might have a spreadsheet that contains a lot of data, not all of which needs to be printed. But rather than duplicating that data to another spreadsheet, or hiding the unwanted rows or columns, you can manually specify the region of the spreadsheet that you wish to print. The options above should give you a solid foundation on which you can start making it a little easier to print files in Excel. You may still encounter scenarios where adjusting one, or many, of these options, won’t help you to achieve your desired printing result. You may also still need to adjust the formatting within your cells (such as centering text across multiple cells) to truly maximize the effectiveness of your printed data, but this should point you in the right direction.
More Information on Printing in Excel 2013
Many of the most useful Excel printing options can be found on the Page Setup menu. You can access this menu by clicking the small Page Setup button at the bottom-right corner of the Page Setup section of the ribbon. Most changes that you make to your Excel print settings won’t apply to other spreadsheets by default. You can find a handful of default settings on the Excel Options menu. This is found by selecting the File tab at the top-left of the window, then clicking the Options button at the bottom-left of the window. If you receive an Excel spreadsheet from another person and there is a lot of formatting already applied to it, then it’s possible that the spreadsheet creator already applied some print settings to the file. You can use the sections in the article above to adjust any of these settings which may be unwanted.
He specializes in writing content about iPhones, Android devices, Microsoft Office, and many other popular applications and devices. Read his full bio here.
