Fortunately it is possible for you to learn how to make a title in Google Sheets, and it simply requires you to make an adjustment on the printing menu.
How to Add Title to Google Sheets
The steps above assume that you are already signed into the Google account containing the file for which you wish to add a title in the print settings. Our guide continues below with more information on how to make a title in Google Sheets, including pictures of these steps. Have you ever printed a spreadsheet, then found it a few months later, only to wonder what the spreadsheet was for, what date it was printed, or what information you should be concerned with? This is very common, especially if you often print updated versions of the same spreadsheet. Working with spreadsheets, whether you are using the Google Apps option, Google Sheets, or the Microsoft Office option, Microsoft Excel, can often be a two-part endeavor. The first part is getting all of the data entered and formatted properly, then the second part is customizing all of the page setup options so that the spreadsheet looks good when it prints. Google Sheets files are a little easier to print by default, but both applications will typically require you to add information to the header or adjust various options so that the printed version of the data is easier to understand. One way to resolve this issue is to use the name of the file in the header. This adds identifying information to each page of the spreadsheet in the event those pages become separated, while also providing valuable information that can help you identify the printout later. Our guide below will show you how to add the workbook title to the header in Google Sheets. Find out how to lock a row in Google Sheets if you would like it to remain visible at the top of your spreadsheet.
How to Add the File Name to the Page When Printing in Google Sheets (Guide with Pictures)
The steps in this article will show you how to change a setting for your Google Sheets workbook so that the title of the workbook is printed in the header, on every page of the spreadsheet. This setting only applies to the current workbook, so you will need to make this change on other spreadsheets for which you want to print the file name.
Step 1: Go to your Google Drive at https://drive.google.com/drive/my-drive and open the file for which you wish to add the workbook name to the top of the page when printing.
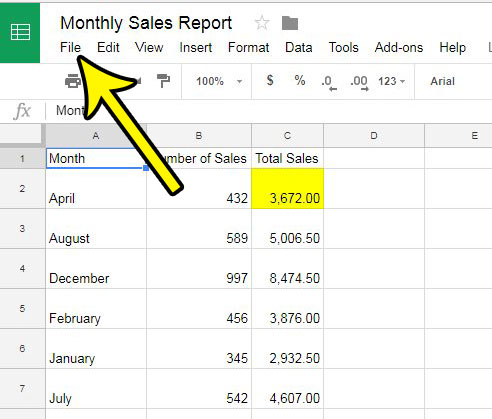
Step 2: Click the File tab at the top of the window.
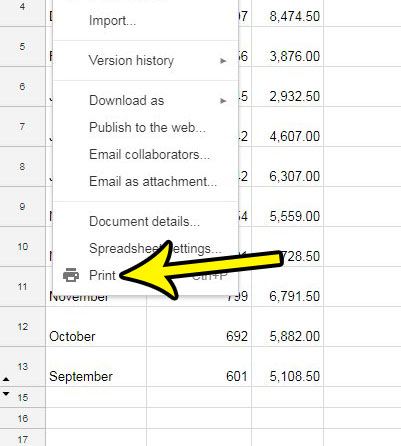
Step 3: Choose the Print option at the bottom of the menu.
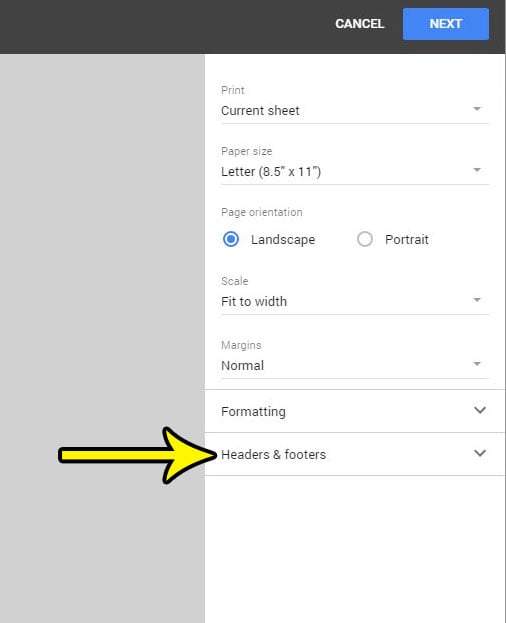
Step 4: Select the Headers & footers option in the column at the right side of the window.
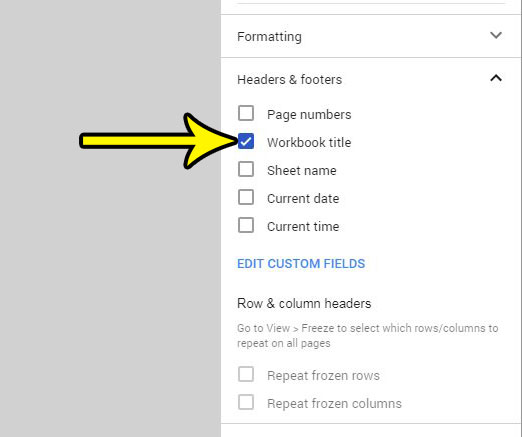
Step 5: Choose the Workbook title option. You can then click the Next button at the top-right of the window and proceed with printing your spreadsheet.
Now that you know how to make a title in Google Sheets you can take advantage of this to include important information in the header or footer of your spreadsheet as you print it. The top row of a spreadsheet can also be called the title row, so you may be wondering how to
Can I Print a Title in Other Google Apps Like Google Docs?
Adding information to the header in Google Docs is a little different. Since you can edit the header directly in a Google Docs document, you won’t find all of the extra print options for the header and footer that you found in Google Sheets. If you want to add the title to the header in Google Docs you will need to double-click inside the header, then type the title of the document into the header. Any information that you add to the Docs header will repeat on each printed page of the document. Google Slides doesn’t really have any kind of way to add information to the header, so the most effective way to do this would probably be by going to Slide > Edit theme then adding a text box to the top of one of the layouts there and including the title of the slideshow. You can then click on one of your slides and select the Slide > Apply layout option and choose the layout with the title.
How to Add a Header Row in Google Sheets By Inserting a Blank Row at the Top
If your spreadsheet doesn’t already have a header row or title row but you want to add one so that you can repeat it on every page, then you may be wondering how to do this. If you click the row 1 header at the left side of the window it will select the entire first row. You can then right-click the selected row and choose the Insert 1 above option to add a blank row above your existing data. You should then add a column header to each cell in the row that describes the type of data that is contained in that column. You can then click the View tab at the top of the window, choose the Freeze option, then elect to freeze the top row or any of the other row options from the drop down menu.
More Information on How to Put a Title on a Google Spreadsheet
The steps above show you how to change a setting when printing in Google Sheets so that the workbook title is included in the header of each printed page. Some of the other things that you can have Google add to the header include:
Page numbers Workbook title Sheet name Current date Current time
The workbook title and the sheet name may seem similar, so it’s helpful to know how Google differentiates them. The workbook title of a Google Sheets file is the name that appears at the top of the window. You can edit this at any time by simply clicking on it and changing it as needed. The sheet name is the name that appears on the tab at the bottom of the window. You can also just click on that to edit it. If you have created a graph or chart in Google Sheets, such as a pie chart, then you did so by selecting a cell range in your spreadsheet and choosing a style of chart to create from that data. If you want to change the chart title that Google Sheets applied to that chart then you can double-click on the title, which is going to open a Chart Editor column at the right side of the window. You can then choose Chart title from the drop down menu and enter the preferred chart title into the Title text field. Do you have fill color in your spreadsheet that you need to remove? Find out how to remove cell shading in Google Sheets if the current fill color is either incorrect or no longer necessary.
He specializes in writing content about iPhones, Android devices, Microsoft Office, and many other popular applications and devices. Read his full bio here.


